Assembly Code for Led Blinking
In order to perform this project we need the following equipment. If you send A it will make to LED ON and if you send B it will make the LED OFF.

8051 Assembly Language Programming Led Blinking Youtube
Now open the app and connect the HC-05 module.
. Open the small door to expose the wire connectors. If we want to manipulate data to a processor or controller by performing subtraction addition. The set of two features a 5- and 6-inch pillar with battery-operated color changing LEDS that provide a safe beautiful glow like traditional candlelight.
Unmatched 6-piece Color Changing LED Candles This multi-purpose non-scented white pillar candle set is ideal for any year-round decorative arrangement. Locate the MCU assembly box attached to the side of the washer back right corner. Set the pin to HIGH 5V this will turn the LED on.
LED_BUILTIN is a constant that contains the number of the pin connected to the on-board LED pin 13 in Arduino Uno. RadioShack High-Brightness 7-Color Blinking LED349 RadioShack CR2032 Battery Holder329 RadioShack 315A 250V 5x20mm Slow-Blow Glass Fuse 4-Pack549 RadioShack 1 Molded Heptagonal Control Knobs 4-Pack599 RadioShack 25A 250V 1-14x14-Inch Slow-Blow Fuse 4-Pack659 RadioShack SPDT Switch. After Connection the blinking LED on the HC-05 will change to a single short blink every 2 seconds.
We set this pin to output in the setup function and then repeat the following code. The 33V power supply from. Take a photo to remember how to reconnect the wires.
A Register is the main part in the processors and microcontrollers which is contained in the memory that provides a faster way of collecting and storing the data. Due to the following reasons. Raspberry Pi Pico board.
To blink the built-in LEDs we have to only connect NodeMCU to the computer using a micro USB cable. Interfacing LED to 8051 Methods Observe carefully the interface LED 2 is in forward biased because the input voltage of 5v connected to the positive terminal of the LED So here the Microcontroller pin should be at LOW level. Open up your favorite text editor and create a.
PB5 ---- LED ---- R220 ohm ---- GND. News analysis from the Middle East worldwide multimedia interactives opinions documentaries podcasts long reads and broadcast schedule. If you cannot remember the user code position you may wish to perform a factory reset to delete all codes associated with the lock.
We are going to write the simplest bare bones code with minimal unnecessary fluff. Test the old user code to make sure it can no longer unlock the door. As always thanks to Keith of Chibiakumas for the cartridge header and hardware routines.
Friday night funkin taki. One 220 ohm resistor. To state the blindingly obvious there are many flavors of microcontroller in the world.
If you have the code for other PIC chips let me know and Ill add them to this post. LED Blinking Connection Raspberry Pi Pico. 68000 Assembly I went a little further and created a 40x30 grid but this implementation is accurate and does have a blinker in it.
Right now I only have the code for the PIC12C508A and the PIC12F629. Now we will start our project to blink an LED using Raspberry Pi Pico in MicroPython with the help of Thonny IDE. In embedded system programming C code is preferred over other language.
If there is no Wifi connection the led on the ESP32 module will keep blinking. The Arduino code also sends the current state of LED also. If youd like to program your own MM3 modchips youll need the source code.
The MM3 chip has three different versions one for each region. Code for Built-in LED Blinking. This Instructable will cover the steps necessary to blink a LED using a PIC microcontroller and Microchip assembly language showing you how to access and use some of the devices hardware peripherals To do this I am going to show you how to.
Vertex in virgo autism. This article provides the information on LED interfacing with 8051 and LED blinking code for AT89C52 AT89C51 Microcontroller. Built-in LED blinking of NodeMCU.
First connect an LED from PB5 see the pinout diagram which is also called Digital Out 13 on an arduino to a 220 ohm resistor then to GND. The remote allows you to set the. On Board LED for ESP8266 is connected wtih GPIO2.
There are innumerable applications for them too. Blinking LED Example Raspberry Pi Pico. There is an Obstacle Detection.
For example if you want to delete the third code add a diff erent user code in position three. The assembly is disconcertingly simple. Pass code to pair is 1234.
This is the source code for a Sega Genesis game that you can compile with VASM. MM3 modchip source code. If you have an American system use the USA version if.
This code is to blink built-in LEDs of NodeMCU. This is pretty straightforward. 5 ways to blink an LED in Arduino - using standard example.
It was tested in the Fusion emulator but it should work anywhere. Review the ouptut of the connection process in the serial monitor. 12V LED Assembly with 85mm Holder - Red330.
Now to write the program. The 8051 assembly language programming is based on the memory registers. The Embedded C code written in above block diagram is used for blinking the LED connected with Port0 of microcontroller.
No external component is required. Disconnect the three wire connectors. Reference Guide Exterior Back panel.
For NodeMCU it is connected with GPIO16. Use a slotted screwdriver to lift the tabs at the bottom of the MCU assembly that secure it to the washer.

Blink A Led With Assembly Language A Pic 11 Steps Instructables
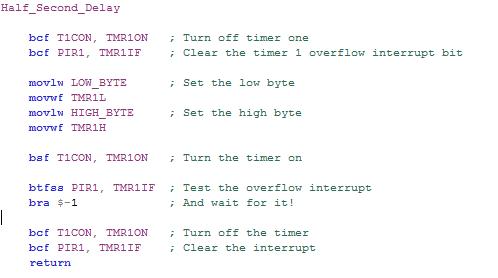
Blink A Led With Assembly Language A Pic 11 Steps Instructables

Blink A Led With Assembly Language A Pic 11 Steps Instructables

Blink A Led With Assembly Language A Pic 11 Steps Instructables
No comments for "Assembly Code for Led Blinking"
Post a Comment